New article en 54
Check & save
In order for your working time to be processed further (e.g. for overtime and payroll), you must check the shift and save it as final.
Step 1: Select Check and Save.
Step 2: Check the recorded times and places for existing conflicts. These will be marked in red for you.
Step 3: Resolve existing conflicts. Usually, time overlaps, time gaps or incorrect locations are the cause.
Step 4: Select Check data and confirm with Save shift.
Causes of shift conflicts
There are three possible conflicts:
Location conflict
The activity starts at a different location than the destination of the previous activity. For example, your preparatory service starts in Seddin, but your car transfer ends in Seddin South.
To resolve the conflict, the two locations must match.
Time-gap conflict
Your layer must not have any gaps.
To solve the conflict you can either adjust the actual times or add another activity.
The overlap conflict:
Time overlaps are also not allowed.
Adjust the times accordingly.
Record working times retrospectively
In post-processing, we sort the working times according to ACTUAL times. This is usually practical, since you record your working times live.
Should you be unable to live-track your work and you have to enter the entire shift later, we are now helping you out with the function set Actual times = planned times and the sort function. As soon as you click on "Edit actual times", the new functions are available to you.
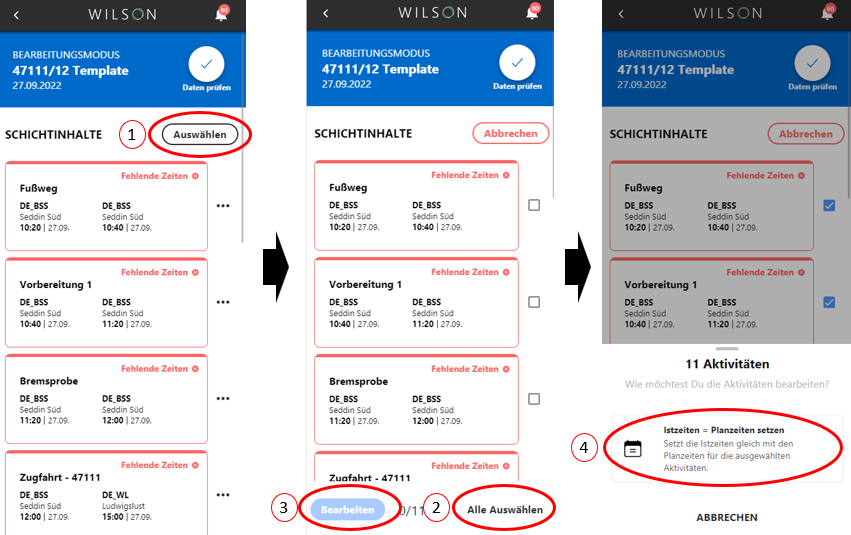
Actual times = planned times
Step 1: Select "Select"
Step 2: Select "Select all" or choose individual activities with the selection boxes
Step 3: "edit"
Step 4: "set actual times = planned times" and confirm. That's all!
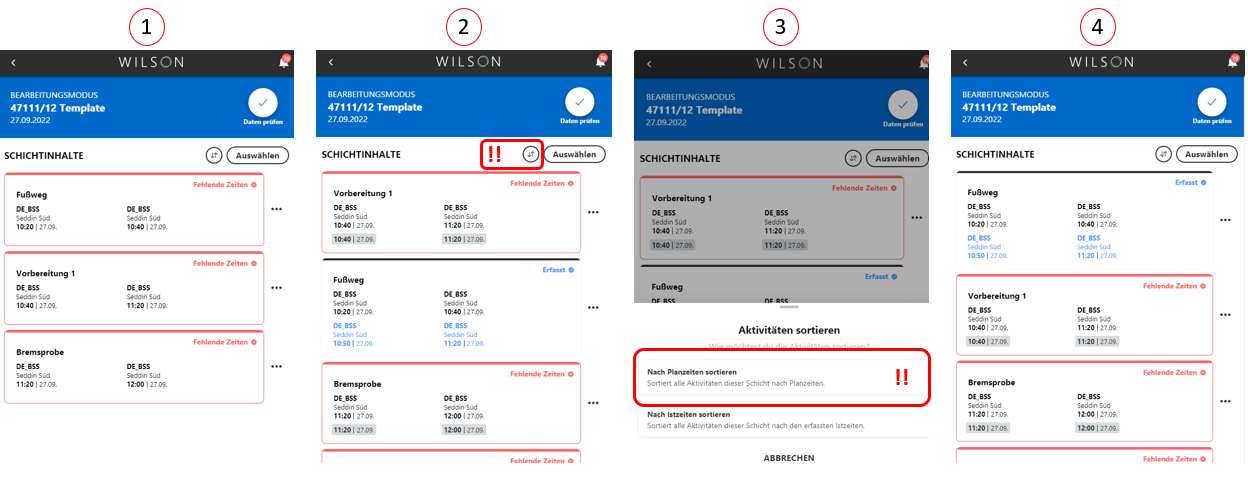
Sort function
Step 1: You have a shift without recorded times and want to add them. As soon as you enter a start time for the first activity, in this case the walk (your shift was late...) WILSON. sorts by actual time.
Step 2: This changes the order of the activities. The footpath has moved to second place, which is not what we wanted. Therefore, select the "sort" symbol above.
Step 3: Now set the sorting according to planned times.
Step 4: Now, the activities are in planned order again and you can enter the remaining times.